Monday, September 24, 2012

New Blog webspace

Now the new page is almost finished and can be visited here:

LumenLiquid <code>

I will insert a redirect as soon as the main page gets ready. As the webspace is ready now, also a new snippet will follow this week. The long awaited snippet for vertex selection in a chunk based map.

Thursday, August 30, 2012

GPU based Geometry Clipmapping II

Here it is, the second part of our series: the basic shader to adjust position and scaling of the sections. In our case, the shader just performs all translation and scalations for us. To get started, we will first render everything in wireframe mode. Lets first start with the shader.
At first we have to declare all required variables.
float4x4 View;
float4x4 Projection;
float3 CameraPos;
float LODscale; //Level Of Detail for scalation
float2 Position; //Position in the ring of sectors

Those variables are needed for our shader. We don't need any World Matrix because we will calculate the matrix by ourselves.
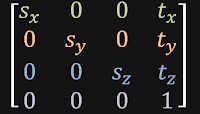
Now it gets somehow tricky, because we need to write a vertex shader which transforms the single vertices to their according position. But while creating a matrix, we have to keep something in mind: A normal identity matrix looks like this:

But HLSL takes the arguments in a different order. Not each single row but each single column. So the initializer has to look something like this:
So for our transform matrix we have to use another order.


Keeping this in mind, we can start to write our Vertex Shader.
float4 mainVS(float2 pos : POSITION) : POSITION{
 float4x4 worldMatrix = float4x4(
  scale, 0, 0, 0,
  0, scale, 0, 0,
  0, 0, scale, 0,
  -Position.x * 32 * LODscale+ CameraPos.x, 0, Position.y * 32 * LODscale+ CameraPos.z, 1);
 float4 worldPos = mul(float4(pos.x, 0.0f, pos.y, 1.0f), worldMatrix);
 float4 viewPos = mul(worldPos, View);
 float4 projPos = mul(viewPos, Projection);
 
 return projPos;
}

As you can see, we have flipped the matrix to work correctly. And we also have to use the double amount of faces to multiply the position with (16 faces -> 32 in shader). The Position parameter is given in sectors, so we have to multiply it with 16 faces.
With this shader it is quite easy to generate geometry clipmaps. As the last part of our shader, we have to write the pixel shader:
float4 wireframe_PS() : COLOR {
 return float4(1.0, 1.0, 1.0, 1.0);
}

The only thing the code above is doing, is to set the color to white.
Now we will define the wireframe render technique.
technique WireframeWhite {
 pass p0 {
  CullMode = None;
  FillMode = Wireframe;
  VertexShader = compile vs_3_0 wireframe_VS();
  PixelShader = compile ps_3_0 wireframe_PS();
 }
}

This snippet just causes the compiler to render everything wireframe.
Now we have build the following shader:

float4x4 View : View;
float4x4 Projection : Projection;
float3 CameraPos : CameraPosition;
float LODscale; //The LOD ring index 0:highest x:lowest
float2 Position; //The position of the part in the ring

float4 wireframe_VS(float2 pos : POSITION) : POSITION{
 float4x4 worldMatrix = float4x4(
  scale, 0, 0, 0,
  0, scale, 0, 0,
  0, 0, scale, 0,
  -Position.x * 32 * LODscale+ CameraPos.x, 0, Position.y * 32* LODscale+ CameraPos.z, 1);
 float4 worldPos = mul(float4(pos.x, 0.0f, pos.y, 1.0f), worldMatrix);
 float4 viewPos = mul(worldPos, View);
 float4 projPos = mul(viewPos, Projection);
 
 return projPos;
}

float4 wireframe_PS() : COLOR {
 return float4(1.0, 1.0, 1.0, 1.0);
}

technique WireframeWhite {
 pass p0 {
  CullMode = None;
  FillMode = Wireframe;
  VertexShader = compile vs_3_0 wireframe_VS();
  PixelShader = compile ps_3_0 wireframe_PS();
 }
}

Now we can turn to the code. As said before, each ring has 12 sectors and the inner one has 16. To determine the position we pass to the shader, we use a simple array:
private readonly Vector2[] _positionIndex = new Vector2[]
            {
                new Vector2(1, -1),
                new Vector2(0.5f, -1),
                new Vector2(0, -1),
                new Vector2(-0.5f, -1),
                new Vector2(1, -0.5f),
                new Vector2(-0.5f, -0.5f),
                new Vector2(1, 0),
                new Vector2(-0.5f, 0),
                new Vector2(1, 0.5f),
                new Vector2(0.5f, 0.5f),
                new Vector2(0, 0.5f),
                new Vector2(-0.5f, 0.5f),
                new Vector2(0.5f, -0.5f),
                new Vector2(0, -0.5f),
                new Vector2(0.5f, 0),
                new Vector2(0, 0)
            };   

The first 12 items determine the ring around the centered 4 sectors which are placed at the end of the array. This is because we can easily decrement the rendered sectors from 16 to 12 without changing anything.
As the last missing part, we have to render our sectors for each LOD.
        public void Draw(GameTime gameTime)
        {
            _terrain.CurrentTechnique = _terrain.Techniques["WireframeWhite"];
            _terrain.Parameters["View"].SetValue(MainGame.Instance.Camera);
            _terrain.Parameters["Projection"].SetValue(MainGame.Instance.Projection);
            _terrain.Parameters["CameraPos"].SetValue(MainGame.Instance.CameraPosition);
            _terrain.Parameters["Heightmap"].SetValue(_heightmap);
            _terrain.Parameters["texel"].SetValue(texelsize);

            int sectors = 16;
            foreach (EffectPass pass in _terrain.CurrentTechnique.Passes)
            {


                for (int l = 0; l < LOD; l++)
                {
                    _terrain.Parameters["LODscale"].SetValue(1 << l);

                    for (int i = 0; i < sectors; i++)
                    {
                        _terrain.Parameters["Position"].SetValue(_positionIndex[i]);
                        pass.Apply();
                        Main.Instance.Device.DrawUserIndexedPrimitives(PrimitiveType.TriangleList, _vertices, 0, _vertices.Length, _indices, 0, _indices.Length / 3, VertexPosition.VertexDeclaration);
                    }
                    sectors = 12;
                }
            }
        }
As you can see, we start with 16 sectors at LOD=0 to a fixed constant value of LODs. For each LOD we cycle trough 12 sectors because after the first LOD the sectors are set to 12. And we also bitshift the current LOD to get the expotential offset. To improve the level of detail, simply increase the vertices used. This sample has shown how to write a geometry clipmapping shader easily. See you for trick III, heightmap implementation!

Chunk based Vertex management

For my project "Heightmap Terrain Editor" I had to deal with very large maps (>2048x2048). To display theese maps I've used chunk based Vertex management. Basically, each chunk is 64x64 faces sized and is stored separately in an array. My method has also very high memory consumption, but for all normal usages it should work fine. First, we initialize an array to keep chunks and vertices:
private volatile VertexPositionColor[][] _vertexChunks;
private int[][] _indicesChunks;

What we do, is simply instance a two dimension array. The first dimension keeps the chunk index and the second dimension keeps the index of the element in the chunk. Now we have to initialize those vertices to start displaying them. For initializing I used two functions, one for vertices and one for indices.
        private void SetUpVertices()
        {
            _vertexChunks = 
                  new VertexPositionColor[_terrainWidth * _terrainHeight][];
            for (int cx = 0; cx < _terrainWidth; cx++)
            {
                for (int cy = 0; cy < _terrainHeight; cy++)
                {
                    _vertexChunks[cx + cy * _terrainWidth] = 
                          new VertexPositionColor[65 * 65];
                    //Chunk mode
                    for (int x = 0; x < 65; x++)
                    {
                        for (int y = 0; y < 65; y++)
                        {
                            _vertexChunks[cx + cy * _terrainWidth]
                                         [x + y * 65].Position =
                                           new Vector3(cx * 64 + x, 
                                                       0,
                                                       -(cy * 64 + y));

                            _vertexChunks[cx + cy * _terrainWidth]
                                         [x + y * 65].Color = Color.White;
                        }
                    }
                }
            }
        }

The greatest problem is to deal with vertex and chunk addressing.With this snippet we initialize 64x64 faces for the chunk based on chunk position and vertex position. The indices aren't a big thing using the snippet above and change it according to indices initialization.
        private void SetUpIndices()
        {
            _indicesChunks = new int[_terrainWidth * _terrainHeight][];

            for (int cx = 0; cx < _terrainWidth; cx++)
            {
                for (int cy = 0; cy < _terrainHeight; cy++)
                {
                    //Chunk mode
                    _indicesChunks[cx + cy * _terrainWidth] = 
                                           new int[(64) * (64) * 6];
                    uint counter = 0;

                    for (int y = 0; y < 64; y++)
                    {
                        for (int x = 0; x < 64; x++)
                        {
                            int topLeft = x + y * 65;
                            int topRight = (x + 1) + y * 65;
                            int lowerLeft = x + (y + 1) * 65;
                            int lowerRight = (x + 1) + (y + 1) * 65;

                            _indicesChunks[cx + cy * _terrainWidth]
                                            [counter++] = lowerLeft;

                            _indicesChunks[cx + cy * _terrainWidth]
                                            [counter++] = topRight;

                            _indicesChunks[cx + cy * _terrainWidth]
                                            [counter++] = topLeft;

                            _indicesChunks[cx + cy * _terrainWidth]
                                            [counter++] = lowerLeft;

                            _indicesChunks[cx + cy * _terrainWidth]
                                            [counter++] = lowerRight;

                            _indicesChunks[cx + cy * _terrainWidth]
                                            [counter++] = topRight;
                        }
                    }
                }
            }
        }

To draw the vertices, we have to get the chunk the viewer is currently standing on
        private int GetChunk(int x, int y)
        {
            int chunkX = x / 64;
            int chunkY = -y / 64;
            if ((chunkX + chunkY * _terrainWidth) < _vertexChunks.Length)
                return (chunkX + chunkY * _terrainWidth);

            if (chunkX > _terrainWidth - 1)
                chunkX = _terrainWidth - 1;
            if (chunkY > _terrainHeight - 1)
                chunkY = _terrainHeight - 1;

            return (chunkX + chunkY * _terrainWidth);
        }

The snippet above is just for calculating the chunk index of the chunk placed at the viewers position. We know that each chunk has 64x64 faces (lines 3&4) and can divide the position trough the chunk size. At next we only have to check whether the chunk exists. For displaying we have to add some chunks around, but's that an easy job.

At next, we draw the drawable chunks.

                    for (int i = 0; i < _drawnchunks.Count; i++)
                    {
                        device.DrawUserIndexedPrimitives(PrimitiveType.TriangleList,
                                                         _vertexChunks[_drawnchunks[i]],
                                                         0,
                                                         _vertexChunks[_drawnchunks[i]].Length,
                                                         _indicesChunks[_drawnchunks[i]],
                                                         0,
                                                         _indicesChunks[_drawnchunks[i]].Length / 3,
                                                         VertexPositionColor.VertexDeclaration);
                    }

Thats it for now. Next time we look a little bit on triangle picking and other editor related stuff.

Wednesday, August 29, 2012

GPU based Geometry Clipmapping I

Currently, I’m trying to implement GPU based geometry clipmaps for fast terrain rendering. The idea was taken from GPU Gems 2, but was too complicated for me. So I’ve made it easier:

Each LOD is represented by a color for red being the highest LOD and green the lowest. I use for each LOD 12 sectors via 16x16 vertices. The inner Layer has no other LOD, so its made of 16 sectors. Each time the LOD decreases, the sector size gets squared. So we can reach very huge landscapes with autofading LOD. To further increase performance and primary memory, we only submit one sector to the shader. This sector is 17x17 vertices big to provide 16x16 faces. The shader transforms and scales the vertice and gets the heightmap uv-coordinates. But later more.
But now some details. To save memory, I use only a Vector2 for the vertices. The 3rd dimension will be added by the shader later on. But because XNA doesn't provide such a struct, we use
private struct VertexPosition
{
    public Vector2 Position { get; set; }

    public static readonly VertexDeclaration VertexDeclaration =
        new VertexDeclaration(new VertexElement(0,
        VertexElementFormat.Vector2,
        VertexElementUsage.Position, 0));
}
For indicating the current texture coordinate, position and size we will use the vertex shader. First we define the Vertex Buffer and Index Buffer.
private VertexPosition[] _vertices;
private int[] _indices;
As said before, we only initialize 16x16 faces and transform them in the vertex shader. The initialization looks like this:
        private void InitializeVertices()
        {
            //Initialize for 16x16. Using 17x17 to remove gaps

            _vertices = new VertexPosition[17 * 17];

            for (int x = 0; x <= 16; x++)
            {
                for (int y = 0; y <= 16; y++)
                {
                    _vertices[x + y * 17] = new VertexPosition 
                     { Position = new Vector2(x, y) };//LOD = 1
                }
            }

            _indices = new int[16 * 16 * 6];
            int counter = 0;

            for (int x = 0; x < 16; x++)
            {
                for (int y = 0; y < 16; y++)
                {
                    int topLeft = x + y * 65;
                    int topRight = (x + 1) + y * 65;
                    int lowerLeft = x + (y + 1) * 65;
                    int lowerRight = (x + 1) + (y + 1) * 65;

                    _indices[counter++] = lowerLeft;
                    _indices[counter++] = topRight;
                    _indices[counter++] = topLeft;

                    _indices[counter++] = lowerLeft;
                    _indices[counter++] = lowerRight;
                    _indices[counter++] = topRight;
                }
            }
        }

New page for <code>!

This blog will be mainly used for posting progress and code snippets of the game engine LumenLiquid.